Showing posts with label how to. Show all posts

Monday, July 9, 2012

How To: Loading a Backpack

Getting ready for the trail...
 
Loading your backpack properly is an essential skill that every hiker needs to learn. It helps you learn your gear and how to organize it in the best fashion for easy accessibility on the trail. The best thing you can do before you start is make your very own checklist of everything you want to bring/own. Having the list saved so you can print it each time makes it hard to forget those little items like bug spray or toilet paper. I always load my backpack for the trail at my house. Doing it this way allows you to lay all of your items out on your living room floor so you can see everything and prioritize.

The following are the parts of a typical pack:


The first thing most backpackers do is shove their sleeping bag down to the bottom of their bag. It depends on the size of your pack but I carry a large 3-4 day pack on all my ventures. I insert my sleeping into the bottom vertically and then place my sleeping bag above that. These are my heaviest items. An important note is that you want to put your heaviest items near the center of your back and close to your spine. Another thing to remember is that the stuff at the bottom of your bag should be things you probably won't need until your at the campsite. After I insert these two items I put some clothes at the bottom of the pack. You want to have your heavy items ABOVE the hip belt to ensure your carrying your load on your hips and not your back/shoulders. Next, I insert items around my sleeping bag and tent to keep them from shifting around. Ensure you load the weight evenly on both side. The ensures one side isn't heavier than the other. After I load these items I load the more akward items like tent poles, crampons, or tent stakes. It is very import that all these items be protected so they don't puncture your pack. I usually wrap a pair of sweat pants or a shirt around the ends so this doesn't happen.

The last items I load are my “most used” items. This could include things like a map and compass, snacks, water, or a knife. You want to put these in a side compartment or top lid compartment for easy accessibility.

Lastly, it's important to remember that you won't pack your backpack perfectly the first time. You may realize you want access to one item sooner than expected and end up moving it closer to the top next time your head for the trail. You will adapt your packing techniques over several trial runs as you learn your gear. If it's your first time with a new pack or heavier gear practice carrying it around the mall or take it on shorter day hikes. This helps you get the “feel” of the pack before your long trip and see how it's going to impact your body. It's to late if you realize a day into a week long trip that your overloaded. Your pack should be an extension of you and feel like it move easily with you.

Got a packing tip that helped you save room or time? Like to put a change of socks at the top of your pack or maybe you carry your tent on the outside? Let me know what you think in the comments section.

Learn. Explore. Survive.

Thursday, February 23, 2012

Understanding Hypothermia


Hypothermia is a a real threat that faces everyone who enters the wilderness and it can manifest itself at any time. Hypothermia is underestimated by many hikers and many of those hikers fall for common myths associated with hypothermia. A few myths about hypothermia are as follows:

One myth is that a quick drink of alcohol will quickly warm a hypothermic person. The truth is that alcohol actually dilates the blood vessels causing a "warming" feeling but also causes accelerated heat loss.

Another myth is that you can develop hypothermia in a matter of minutes if the circumstances are right. The truth is that even a victim that falls into an icy lake would have up to 30 minutes before they developed hypothermia.

Myths like these could potentially derail any first aid efforts in the wilderness. It is important that everyone understands the early warning signs of hypothermia to help prevent a life threatening condition miles from help.

Hypothermia is generally described as a state in which the body's mechanism for temperature regulation is overwhelmed in the face of a cold stressor. Hypothermia is broken down into several categories and degrees including, intentional and accidental, primary and secondary, and by the degree of hypothermia.

IntentionalIntentional Hypothermia is used in the medical field to slow down the body during a trauma.

Accidental Accidental Hypothermia is the most common form of hypothermia and is typically caused by an unanticipated exposure by an unprepared person. Examples of accidental hypothermia include being caught in a winter storm, inadequate shelter in the wilderness, or even getting exposed to rain in a mild environment.

SecondarySecondary Hypothermia is generally not experienced by hikers since it is caused by an underlying illness that lowers the bodies core temperature.

PrimaryPrimary Hypothermia is caused by exposure to the environment and not an underlying illness.

It is important to note that even severe hypothermia can be reversed so the early recognition of warning signs will help prevent a medical emergency.

Moderate Hypothermia: Symptoms of mild hypothermia may be vague and can be easily overlooked. The following symptoms may occur:

  • Shivering
  • Rapid Pulse
  • Rapid Breathing (20+ breaths a minute)
  • Mental confusion
  • Cold or pale skin
  • Tiredness

Moderate Hypothermia: In moderate hypothermia symptoms become more pronounced and visible. It is important to get the victim warm immediately if any of the following symptoms occur.

  • Violent, uncontrollable shivering (at lower temperatures shivering may stop since the body can no longer produce heat)
  • Unable to concentrate on normal tasks
  • Loss of judgement (Some people try to push on since they stop shivering)
  • Increased drowsiness
  • Slurred speech
  • Slow, shallow breathing

Severe Hypothermia: Medical attention should be requested immediately if a state of severe hypothermia has been reached. A severe hypothermic person may appear to be dead but may be in a deep state of severe hypothermia.

  • Unconsciousness (Comatose)
  • Shallow or no breathing
  • Weak, irregular or no pulse
  • Dilated pupils

Treatment of Hypothermia: These treatments should never be used over actual medical treatment when available and should only be used in an emergency.
  • Insulate the ground
  • Get into pre-warmed sleeping bags
  • Start a fire to warm up near
  • Drink warm liquids with sugar (sugars help fuel shivering to warm the body)
  • Apply heat to neck, armpits, and groin (Use warm rocks or water bottles, warm but not hot to the touch)
  • Skin to skin contact with a warmer person (Get inside a sleeping bag together)
  • Seek medical treatment


Hypothermia is a life threatening condition that should always be taken seriously. Always seek medical attention no matter how confident you are about your state of hypothermia. Anyone in any weather condition can be sent into a hypothermic state. Always stop and address your situation regardless of your destination or plans. A comprehensive understanding of hypothermia could be the difference between life or death. I hope everyone takes the time to learn about hypothermia before adventuring into the wilderness. Learning the fundamentals of hypothermia can help you explore your surroundings safely, ensuring that survive another day.

Learn. Explore. Survive.

Sunday, February 19, 2012

How To: Bug-Out Bag

A bug-out bag is a portable kit that contains the items one would require to survive for seventy-two hours when evacuating from a disaster. The point of the bug-out bag is that it is used to evacuate and not used as a long term survival tool. The bug-out bag also has been called the 72 hour pack, GOOD (Get Out Of Dodge), or the PERK (Personal Emergency Reloaction Kit). It is used to carry everything you would need to survive for 48-72 hours but with basic survival skills you could use it as a supplement and survive for much longer if you had to.

When designing your own bug-out bag you should consider your local environment, your skills, who you'll support, and other various details unique to only your situation. You want to customize this bug-out bag for you since your the one who will have to use it. It is also important to put you bag to the test by testing it on the trail or druing a mock evaluation. This helps your identify weaknesses in your bug-out bag.

Alot of people design thier bug-out bags using large duffel bags that can be transportsedwhile they excape in thier vehicle. I personally don't like this idea since there is always a chance that your car won't be available and your limited by fuel range. I personally like the option of using a typical backpacking backpack or similiar military pack from a gun store. It allows me the comfort of knowing that I can carry my pack as far as my legs will take me.

What you will bring in your bug-out bag is different what I'd bring in mine but the following is my recommended list for what I'd bring in the Washington State Area or United States Pacific Northwest.

Fire Making:
For this catagory you want to bring everything that would be needed to hep support fire making.


Water:

In this catagory you want everything you would need to boil water, carry water, and sterilize it. It is recommended that you bring 1 gallon of watrer per person per day.


Shelter:

This area requires that you bring everything you'd need to establish a shelter and everything needed for sleeping.
  • Backpacking Tent
  • Tarp for emergency shelter and to protect your tent
  • Tent Repiar Kits
  • Sleeping bags equal to the areas weather
  • 40-50 of 550lb paracord
  • Duct Tape Roll

Navigation:

You need to ensure you can navigate you desired excape route so great detail must be put into planning your route and ensuring you have a back up routes as well. Also, it is importtant to practice your routes so you don't get lost. It may seem easy to follow on your map but the execusion might not go off as planned and you don't want that to happen during an emergency.

  • Maps of your local city area
  • Topographic maps if you heading to the wilderness
  • Compass
  • GPS (may not work during an emergency but always good to have.)

Clothes:

A base set of clothes is a great start here that way if you can add to it during an emergency. Carry everything you'd need to stay dry and warm.

  • Wool socks (will still be warm even when wet)
  • Beanie or Hat
  • Gloves
  • Pants and shirts (not cotton since it takes all long time for it to dry)

Protection:

Personal protection is always a personnal choice when choosing what to bring but I recommend some basics since during a emergency situation normal people could act quite crazy to be frank. People riot after teams win championships so it's not impossilbe to think that this will happen in an emergency.

  • Pepper Spray (Used to fend off less agressive individuals)
  • Fixed blade Survival Knife
  • Multi-tool
  • Gun (Carry extra ammo and a cleaning kit)
  • First Aid Kit with medication
  • Whistle to signal rescuers

Miscelaneous Items

The catagory covers anything that should be brought that doesn't fit into one of the main catagories.

  • SD Card with pictures of important documents (Social Security Cards, Birth Cetificates, Etc)
  • Toilet Paper
  • Cash (power may not be avaialable so bank cards will be useless)
  • Crank Operated Radio / Battery Operated
  • Flashlight or lanterns with extra batteries
  • Standard ID's (Drivers Liscence, Military ID, or the equivalent)

It's important to remember to bring everything you would need for your child or pet as well. Remember when building your bug-out bag that you can't take everything but you need to bring only what you'd need to survive for 72 hours using no outside support. What would you bring in your bag that might not be listed above?


Learn. Explore Survive.

Monday, February 6, 2012

How To: Double Layer Paracord Survival Bracelet

Double Layer 550lb. Paracord Survival Bracelet\


In this how to I'm going to show you how to make a Double Layer 550lb Paracord Survival Bracelet. With this bracelet you can easily carry an extra 15-20 feet of 550lb Paracord for emergencies. The following tools and materials are needed:

1.  (2) 10 Foot Lengths of Paracord (different colors if you want contrast like the one above.)
2.  Scissors or Knife
3.  Lighter

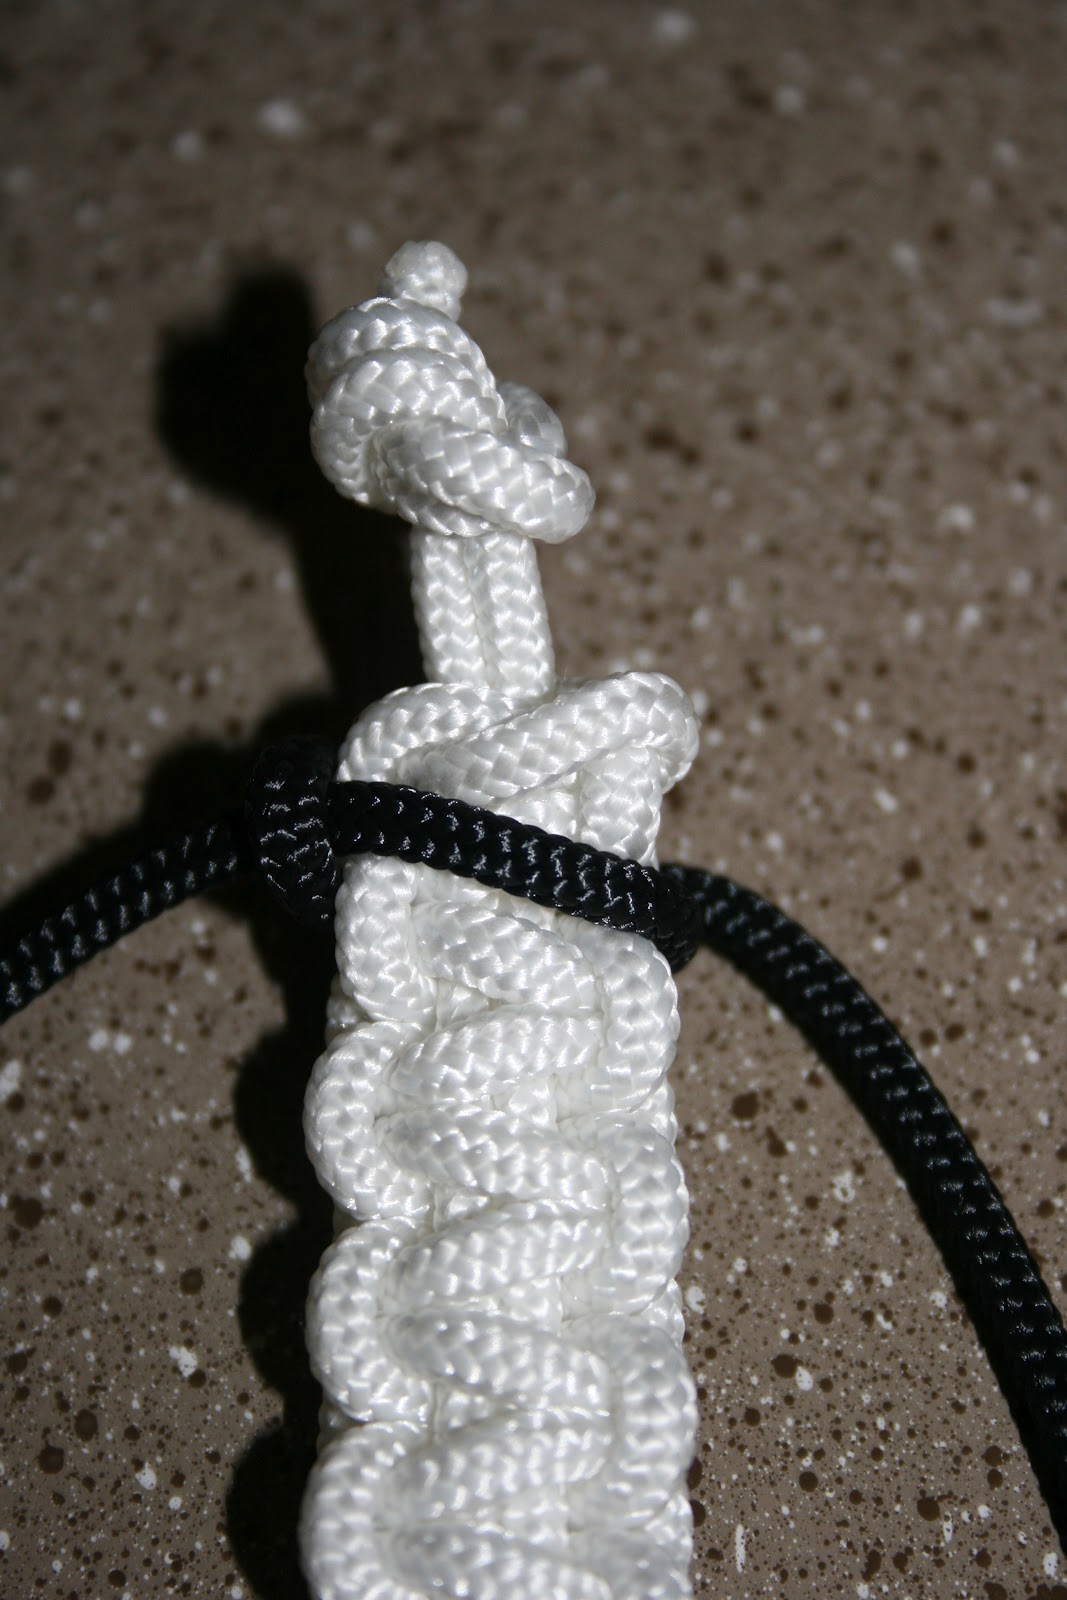
Step 1: Cut 10-12 feet of paracord depending on the size of your wrist. If you worried, it's always better to have to much. Once you cut it, use the lighter to burn the ends of the paracord so it doesn't fray. You can smooth the ends out while its still hot so you don't get giant blobs on the ends. WARNING:  Melted paracord is hot, smooth the ends with quick motions or use gloves.


Picture A

Step 2: Double up the paracord and measure your wrist with it. You should be able to loop it around your wrist and then fit 3 fingers under the band. Cut and burn the ends once you've measured it. Now tie a knot in the end of the paracord like in photo "A".  An easy way to be safe is leave extra to the right of the knot so you can loosen later if it to tight.


Step 3: Loop the first color around the backside of the wrist piece you made. 


 Step 4: Pass the left side under the wrist piece.


 Step 5: Pass the right piece under the left piece, over the wrist piece and then pass it through the loop on the left side. 


Step 6: Tighten the knot around the wrist piece to secure it. Leave about 1/4 - 1/2 inch from the top knot so it can swivel and secure correctly at the end.


Step 7: Now your going to make a knot on the right side so you can alternate the pattern. Pass the right line under the wrist piece. Then pass the left piece under the right piece, over the wrist piece and through the left loop. Tighten the knot.


Step 8: Continue alternating the pattern and stop once you get close to the end. Repeat steps 3-7 to get to the end. If you forget which side loop you just did just look for the lowest side loop (as seen in the left picture) and that's the side you just did so you need to start on the opposite.  Once you finish cut off any extra and burn the ends on the bracelet to prevent fraying. Again, push them in while still hot to smooth them.


Step 9: Repeat step 3-8 with the other color, just add it over the first layer. Once you get to the end of the second color and burn the ends just like before. Once you've finished the entire bracelet, size it one more time and adjust your knot so it fits to your liking and the cut off the extra and smooth it. 


Congratulations, You've Completed Your Survival Bracelet.

This bracelet will help ensure you always have rope when you need it. You don't even need to remember to pack it. This will help you survive the worst. Feel free to leave comments and thoughts on how to improve your survival bracelet. 

Learn. Explore. Survive.